Creating Tabs with HTML, CSS & jQuery
- 6 min read
In this tutorial, we’re going to look at how to create tabs in HTML, CSS and jQuery. If you get stuck, don’t hesitate to ask me a question.
Tabs are a great way of grouping lots of content into a very small space. Think of tabs like the TARDIS…bigger on the inside. They can be incredibly handy when you have a lot of content that would simply fill up your page with too much information in one go.
You might also like: Creating an Accordion with HTML, CSS & jQuery.
Table of Contents
- Skip to the HTML
- Skip to the CSS
- Skip to the jQuery
1.) The HTML
Completed Code (HTML)
I go into detail on the specifics of the HTML layout below.
<div class="tabs">
<ul class="tab-links">
<li class="active"><a href="#tab1">Tab #1</a></li>
<li><a href="#tab2">Tab #2</a></li>
<li><a href="#tab3">Tab #3</a></li>
<li><a href="#tab4">Tab #4</a></li>
</ul>
<div class="tab-content">
<div id="tab1" class="tab active">
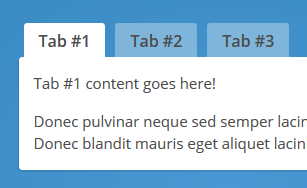
<p>Tab #1 content goes here!</p>
<p>Donec pulvinar neque sed semper lacinia. Curabitur lacinia ullamcorper nibh; quis imperdiet velit eleifend ac. Donec blandit mauris eget aliquet lacinia! Donec pulvinar massa interdum risus ornare mollis.</p>
</div>
<div id="tab2" class="tab">
<p>Tab #2 content goes here!</p>
<p>Donec pulvinar neque sed semper lacinia. Curabitur lacinia ullamcorper nibh; quis imperdiet velit eleifend ac. Donec blandit mauris eget aliquet lacinia! Donec pulvinar massa interdum risus ornare mollis. In hac habitasse platea dictumst. Ut euismod tempus hendrerit. Morbi ut adipiscing nisi. Etiam rutrum sodales gravida! Aliquam tellus orci, iaculis vel.</p>
</div>
<div id="tab3" class="tab">
<p>Tab #3 content goes here!</p>
<p>Donec pulvinar neque sed semper lacinia. Curabitur lacinia ullamcorper nibh; quis imperdiet velit eleifend ac. Donec blandit mauris eget aliquet lacinia! Donec pulvinar massa interdum ri.</p>
</div>
<div id="tab4" class="tab">
<p>Tab #4 content goes here!</p>
<p>Donec pulvinar neque sed semper lacinia. Curabitur lacinia ullamcorper nibh; quis imperdiet velit eleifend ac. Donec blandit mauris eget aliquet lacinia! Donec pulvinar massa interdum risus ornare mollis. In hac habitasse platea dictumst. Ut euismod tempus hendrerit. Morbi ut adipiscing nisi. Etiam rutrum sodales gravida! Aliquam tellus orci, iaculis vel.</p>
</div>
</div>
</div>Tab Links
Starting off there’s a div with class="tabs". Inside there’s an unordered list, (or an ordered one if you like, it makes no real difference), with class="tab-links". Inside the list items there are anchor links. The first list item is marked as class="active". This indicates where to start the tabs.
Note: When the CSS is all done, the tab link parent with class="active" will be the highlighted one on page load.
<div class="tabs">
	<ul class="tab-links">
		<li class="active"><a href="#tab1">Tab #1</a></li>
		<li><a href="#tab2">Tab #2</a></li>
		<li><a href="#tab3">Tab #3</a></li>
		<li><a href="#tab4">Tab #4</a></li>
	</ul>
</div>
Tab Content
There’s a div with class="tab-content". Inside of that, we have 4 divs, each with class="tab", (this number corresponds to how many tab links there are). The currently visible tab will also need an active class, e.g. class="tab active".
<div class="tab-content">
	<div id="tab1" class="tab active">
		<p>Tab #1 content goes here!</p>
		<p>Donec pulvinar neque sed semper lacinia. Curabitur lacinia ullamcorper nibh; quis imperdiet velit eleifend ac. Donec blandit mauris eget aliquet lacinia! Donec pulvinar massa interdum risus ornare mollis.</p>
	</div>

	<div id="tab2" class="tab">
		<p>Tab #2 content goes here!</p>
		<p>Donec pulvinar neque sed semper lacinia. Curabitur lacinia ullamcorper nibh; quis imperdiet velit eleifend ac. Donec blandit mauris eget aliquet lacinia! Donec pulvinar massa interdum risus ornare mollis. In hac habitasse platea dictumst. Ut euismod tempus hendrerit. Morbi ut adipiscing nisi. Etiam rutrum sodales gravida! Aliquam tellus orci, iaculis vel.</p>
	</div>

	<div id="tab3" class="tab">
		<p>Tab #3 content goes here!</p>
		<p>Donec pulvinar neque sed semper lacinia. Curabitur lacinia ullamcorper nibh; quis imperdiet velit eleifend ac. Donec blandit mauris eget aliquet lacinia! Donec pulvinar massa interdum ri.</p>
	</div>

	<div id="tab4" class="tab">
		<p>Tab #4 content goes here!</p>
		<p>Donec pulvinar neque sed semper lacinia. Curabitur lacinia ullamcorper nibh; quis imperdiet velit eleifend ac. Donec blandit mauris eget aliquet lacinia! Donec pulvinar massa interdum risus ornare mollis. In hac habitasse platea dictumst. Ut euismod tempus hendrerit. Morbi ut adipiscing nisi. Etiam rutrum sodales gravida! Aliquam tellus orci, iaculis vel.</p>
	</div>
</div>
2 The CSS
I’m going to keep it simple with basic CSS (as opposed to an SCSS pre-processor like Sass, Less or Stylus). The bulk of this tutorial is aimed at beginners, so I’m taking that into account.
Completed Code (CSS)
I go into detail on the specifics of the CSS styling below.
/*----- Tabs -----*/
.tabs {
	width:100%;
	display:inline-block;
}

/*----- Tab Links -----*/
/* Clearfix */
	.tab-links:after {
	display:block;
	clear:both;
	content:'';
}

.tab-links li {
	margin:0px 5px;
	float:left;
	list-style:none;
}

.tab-links a {
	padding:9px 15px;
	display:inline-block;
	border-radius:3px 3px 0px 0px;
	background:#7FB5DA;
	font-size:16px;
	font-weight:600;
	color:#4c4c4c;
	transition:all linear 0.15s;
}

.tab-links a:hover {
	background:#a7cce5;
	text-decoration:none;
}

li.active a, li.active a:hover {
	background:#fff;
	color:#4c4c4c;
}

/*----- Content of Tabs -----*/
.tab-content {
	padding:15px;
	border-radius:3px;
	box-shadow:-1px 1px 1px rgba(0,0,0,0.15);
	background:#fff;
}

.tab {
	display:none;
}

.tab.active {
	display:block;
}
Tabs Container
The display:inline-block; adds a type of clearfix while also making it more ‘stable’ than if we used display:block;.
The reason we use a clearfix above yet not here is as follows: display:inline-block; sometimes adds 7px-ish of margin below the affected element with no way of removing it. Sometimes using a minus bottom margin works, but it depends heavily on how your HTML is structured. In this instance it’s fine.
/*----- Tabs -----*/
.tabs {
	width:100%;
	display:inline-block;
}
Tab Link Wrappers
We declare no list-style to stop it appearing as a default list. Then the margin so the links are spaced evenly apart, (using margin:0px 5px; is the same as using margin:0px 5px 0px 5px;).
.tab-links li {
	margin:0px 5px;
	float:left;
	list-style:none;
}
Tab Links
These are all basic styles which you should understand if you’re attempting this tutorial. If you don’t, please find the proper values and the definitions for each on the CSS-Tricks Almanac.
You may be wondering why I’ve used transition:all linear 0.15s; instead of transition:background linear 0.15s;. The reason is simple, in my experience, you have to think ahead. If you don’t then nasty, (sometimes hard to fix), bugs pop-up seemingly out of nowhere. By using background instead of all, we’d be limiting what can be transitioned on the :hover effect. Since this is a tutorial, many of you may want to change the text colour on hover. By using all instead of background that makes it possible.
.tab-links a {
	padding:9px 15px;
	display:inline-block;
	border-radius:3px 3px 0px 0px;
	background:#7FB5DA;
	font-size:16px;
	font-weight:600;
	color:#4c4c4c;
	transition:all linear 0.15s;
}

.tab-links a:hover {
	background:#a7cce5;
	text-decoration:none;
}

li.active a, li.active a:hover {
	background:#fff;
	color:#4c4c4c;
}
Tab Content
This is the background of the tab content section.
/*----- Content of Tabs -----*/
.tab-content {
	padding:15px;
	border-radius:3px;
	box-shadow:-1px 1px 1px rgba(0,0,0,0.15);
	background:#fff;
}
Non-Active/Active Tab Content
We set all tabs to display:none; which hides them. Then we set the active tab to display:block; so only that one will show up. It’s a simple case of using CSS the way it was designed, which was to cascade down. Hence the name, Cascading Stylesheets.
.tab {
	display:none;
}

.tab.active {
	display:block;
}
You might also like: Creating a Dropdown Menu with HTML & CSS
3 The jQuery
Below you can see the completed jQuery code. Keep scrolling for a good explanation of how it all works and what it all means.
Let me clarify something before we start: Everyone has their own way of coding, with jQuery this is mine. Writing it out like this makes it easier for a beginner to grasp, it’s also efficient.
Completed Code (jQuery)
jQuery(document).ready(function() {
	jQuery('.tabs .tab-links a').on('click', function(e) {
		var currentAttrValue = jQuery(this).attr('href');

		// Show/Hide Tabs
		jQuery('.tabs ' + currentAttrValue).show().siblings().hide();

		// Change/remove current tab to active
		jQuery(this).parent('li').addClass('active').siblings().removeClass('active');

		e.preventDefault();
	});
});
Basic Setup
You have to start by checking if the document is ready, for this we use:
jQuery(document).ready(function() {
	// Code Here
});
Next is to check if the user has clicked on a tab, to do that we simply reference every link that happens to be a tab link with .tab-links a.
jQuery('.tab-links a').on('click', function(e) {
	// More Code Here
});
Dynamic Variable
Next, we create a variable called currentAttrValue, (current attribute value), which grabs the href="" of the clicked anchor link.
var currentAttrValue = jQuery(this).attr('href');Match Anchor Link to Div #ID
We need a way of matching up the .tab-link anchors with .tab sections. We start off by referring to the entire tabs component, with .tabs, then we say “If .tabs has a child with an #id that then matches a .tab-link href="", then they should be linked up”.
Then we say “Show the element with the referenced #id, such as #tab2, then find the other tabs, which are siblings of #tab2, and hide them”.
jQuery('.tabs ' + currentAttrValue).show().siblings().hide();Giving The Tab Link an Active State
Changing the active state of the tab link is relatively the same as showing/hiding the tab content.
First, we look for jQuery(this), which is the current anchor link being clicked. Then we find it’s parent list item with .parent('li') tag. After that, we give that parent list item a class of .active by using .addClass('active'). Lastly, we find all siblings of that parent list item and remove, if any, classes of .active by using .siblings().removeClass('active').
jQuery(this).parent('li').addClass('active').siblings().removeClass('active');Prevent Default Anchor Link Behaviour
You may notice that when you click an anchor link with an #id specified instead of an actual URL, it tends to add the #id into the address bar. E.G. http://sebkay.com becomes http://sebkay.com/#id. This can be a massive pain-point for users when trying to click the back button.
To get past that UX problem we use:
e.preventDefault();This handy little function stops the default action of the clicked element from happening.
Remember when we put that function(e)at the start of our click event? Well, this is where that ties in.
Extra Credit: jQuery Animations
You may not like the way it just jumps to the new tab content without any nice animation of any kind, well here’s some extra credit.
To apply these changes simply replace the below snippet with the other code snippets that follow.
Default
// Show/Hide Tabs
jQuery('.tabs ' + currentAttrValue).show().siblings().hide();
Fade
// Show/Hide Tabs
jQuery('.tabs ' + currentAttrValue).fadeIn(400).siblings().hide();
Slide 1
// Show/Hide Tabs
jQuery('.tabs ' + currentAttrValue).siblings().slideUp(400);
jQuery('.tabs ' + currentAttrValue).delay(400).slideDown(400);
Slide 2
// Show/Hide Tabs
jQuery('.tabs ' + currentAttrValue).slideDown(400).siblings().slideUp(400);
Conclusion
If you’re reading this conclusion, (most people, including me, tend to leave after they’ve got the code they were after), then please leave a comment below with any problems or bugs regarding this tutorial. I’m writing this to help people learn and become the best they can be.
You might also like: 21 Must-Have Front End Development Tools.
Steve Lefkowitz
August 4, 2014 at 9:25 pm
This is a beautiful and well thought out tutorial presentation, so thank you! Unfortunately, like many of these Jquery tutorials that profess to be user friendly for beginners, the author has left out some of the steps that a non-javascript savvy, newer coder is going to need to use this code in a specific document. Where are the steps that say: paste this javascript here (or there) and then link it to …whatever by typing (something) on line…xyz of …….etc. My biggest problem with trying to use all this code that’s on offer by all the many tutorial writers is that no one goes on to explain how to situation the code in a specific or other semantic element of my document. The best I can do is download someone’s html, the css and the javascript and make a lonely tab set sitting in the middle of an otherwise blank white document–all the tabs work (yay!) but when I try to build a document around it, or (better still) try to fit it into an existing document where I’d like it, either the document, the tabs, or both completely fall apart. Your tutorial takes an abundance of care (much more than most) in explaining how it all works, but there’s nothing really here about what/where/how to install it in my job.
Seb Kay
August 4, 2014 at 9:30 pm
Hey Steve,
I completely understand and agree. It can be tricky to cater to all skill levels when writing a tutorial in regards to something like this however that is my job so I will go into more detail next time. I’m definitely taking your feedback into account for future tutorials.
Is there anything I can help you with or do you have any tutorial requests while you’re here?
Jared
July 31, 2014 at 9:57 pm
Thanks for the awesome tutorial! Works great.
I have one question, however. How would I get my tab to stay in an active state (same as hover state) until another tab has been clicked?
R
July 31, 2014 at 12:34 pm
Does Google index the content of each Tab or just the active one? I just would like to know how Google friendly is the script.
If I have some content in tab 2, and someone comes from Google to see that content will Google redirect straight to Tab 2 or not?
Seb Kay
July 31, 2014 at 12:37 pm
Yes Google will index the whole page even of some content is hidden with CSS. The only reason it may not is if you’re using Ajax however this is a simple CSS trick.
tl;dr Yes Google will index the content 🙂
Guillermo Perez
July 29, 2014 at 4:50 pm
“Thank you!, excellent job!
SHATEL
July 29, 2014 at 5:55 am
very very very good…
thanks.
Twinkle Star
July 29, 2014 at 4:32 am
hi there! i tried working on tabs using your tutorial. but i think the jquery is not working.
nothing happens when i click any of the tabs. i don’t know where im doing here. below is a portion of my code:
on my header, i have written this:
and on my body:
var $m = jQuery.noConflict();
$m(document).ready(function() {
$m(‘.tabs .tab-links a’).on(‘click’, function(e) {
var currentAttrValue = $m(this).attr(‘href’);
// Show/Hide Tabs
$m(‘.tabs’ + currentAttrValue).slideDown(400).siblings().slideUp(400);
// Change/remove current tab to active
$m(this).parent(‘li’).addClass(‘active’).siblings().removeClass(‘active’);
e.preventDefault();
});
});
i followed the html as written on the tutorial.
please advise me how to fix this. thanks.
Twinkle Star
July 29, 2014 at 4:52 am
also, i find this error on Chrome:
Uncaught TypeError: undefined is not a function and it pointed to this line:
$(‘.tabs .tab-links a’).on(‘click’, function(e)
same when i tried inspecting element in firefox.
Seb Kay
July 29, 2014 at 9:20 am
Hi, the code in this tutorial only works with jQuery 1.10.1. If you’re using the latest version write
instead of .I’ll update the tutorial now for future reference.
Jordi
July 28, 2014 at 10:01 am
Seb, you did it! You helped me learn and become the best I can be (still working on this 🙂 This is a great tutorial. Thank you for sharing Seb.
Ahmed Salim
July 23, 2014 at 4:36 pm
Great Article
I have Simple Question For Arabic Language We Always Use Direction From Right To Left can You Advise Me To Do That
Seb Kay
July 24, 2014 at 7:37 am
Hi Ahmed,
I haven’t got much experience with Arabic language in web design, however I found those 2 articles that might help:
– http://viget.com/flourish/designing-for-rtl-languages-the-basics
– http://demosthenes.info/blog/88/Using-Arabic-Hebrew-and-Other-Right-To-Left-Languages-In-Web-Pages
They seem to have a good idea on the pricipals of designing/developing for Arabic language. Hope this helps.
Zy
July 22, 2014 at 3:05 am
Hi Seb,
Been wanting to apply this tab but on a vertical display. What CSS should I change based from the top?
Seb Kay
July 22, 2014 at 10:38 pm
It shouldn’t be too difficult. I’ll give it a try and post a jsFiddle within the next day or two for you 🙂
Cate
July 20, 2014 at 8:16 am
Hi Seb,
Thanks for your tutorial, I am having the same problem as everyone else with the tabs not changing and I have tried all of the solutions you have previously posted and none of them work. I have uploaded my code to JSFiddle. Have you got time to have a look? http://jsfiddle.net/P2Swf/
Thank you so much in advance!
Congratulations on your wedding!
Cate
Seb Kay
July 20, 2014 at 11:10 pm
Hi Cate,
Thanks for the congrats!
To solve your problem simply change the first part of the jquery to this
. Let me know if this solves your problem.Cate
July 21, 2014 at 8:45 am
Hi Seb,
Thanks for getting back to me so quickly 🙂
Your fix didn’t work 🙁 (I wish it had!). Any other suggestions would be great…
I am just a beginner with all this jquery stuff too and even though this particular code isn’t working at the moment I’ve been using your tutorial to add other jquery elements to my site – so thank you 🙂
Cate
Seb Kay
July 21, 2014 at 9:17 am
If it’s still not working then I’m pretty sure the reference to jQuery is somehow the problem. On jsFiddle you have to set the jQuery version in the sidebar. Can you try referencing jQuery from here
Let me know how you get on.
Cate
July 21, 2014 at 11:24 am
Hi Seb,
IT WORKS 🙂
You gave me a clue that I was missing a file. I wasn’t sure what you meant by “I have set the jquery version in the sidebar” (I am a really new beginner) but I cut and paste the code from the link you included and saved it as a .js file in my website folder and added the file to the head of my code and then it worked. There’s nowehere to ‘download’ any files and no reference (that I understood) that I needed extra info. This has been a steep learning curve for me and I appreciate your time and patience in explaining things to me and helping me out.
Thank you!
Cate
Beto
July 24, 2014 at 5:06 pm
Hi Cate and Seb,
Did you really fixed the problem with no changing tabs?
I alreaddy did all fixes that you had (I have the same), but is not still working.
I have the HTML, CSS and Js same as yours, but I don’t really know whats going on.
Thanks!!!
Seb Kay
July 24, 2014 at 7:52 pm
Can you post your code to http://jsfiddle.net? I’d be more than happy to take a look for you 🙂
obi-wayne
July 19, 2014 at 2:08 pm
Hello,
Nice tutorial up there. As a beginner I got most of the stuff that you explained. My question is, can I use only the HTML and CSS codes to work more on them? I mean can I just leave the jQuery part, because I’m yet to learn the basics of jQuery. You see I’m trying to create this interface that’ll have multiple tabs with multiple textboxes in them. Now the questions I had for creating the tabs, you pretty much cleared those out. Will knock you later if I face any problems. Can you please tell me a bit on how can I play with textboxes in each of my tab contents? I mean since I’m a beginner, I don’t know much on the positioning and padding/margin stuff. Maybe a bit on the designing of the textboxes too if you can.
Thanks!
Seb Kay
July 19, 2014 at 8:39 pm
Hi obi-wayne,
I don’t really understand your question. Did you mean you want help with general CSS styling?
rajabau
August 2, 2014 at 11:35 am
its good and intersting
Indraja
July 16, 2014 at 5:42 am
thank you for lovey explanation on this… the demo seems enough for basic learning… 😀 thanks.
Jan Hof
July 11, 2014 at 11:13 am
Thanks for this elegant solution and clear explanation. It was very usefull for me. And a bonus is that I don´t need an extra plugin for tabs on a webpage.
Felix
July 9, 2014 at 12:25 pm
Hi Seb,
I have only been coding in really basic html for a day. I have tried to make the background colour of the tabs different from one another so one green one purple and so on. Could you please help me do this.
Thanks Felix 🙂
Seb Kay
July 15, 2014 at 6:04 pm
Hi Felix, my apologies for the late reply. I got married in the week and time just seemed to dissapear.
Can you post a http://jsfiddle.net of your code for me to look at?
sarah
July 6, 2014 at 9:10 pm
Hi Seb – fantastic tutorial, thanks! Your tab solution is one of the best out there.
Harmony
July 4, 2014 at 9:20 am
Hi Seb,
I’m super new to CSS and jQuery (like virtually no knowledge). I’ve done some research and I’m being told I need to paste the jQuery in the header.php file in between the header and meta tag. When I just copy and paste your code from above, all of a sudden all this weird wording shows in my header on the website. I’m sure I’m doing something obvious wrong. Any guidance for a newby like me? Thanks so much!!
Seb Kay
July 4, 2014 at 9:30 am
Hi Harmony, I would advise against putting your jQuery in the header. It’s perfectly ok to do so but in practice it makes it easier to manage you code when it’s in separate files. HTML, CSS and jQuery all separate.
If you go to https://www.inspirationalpixels.com/wp-content/themes/inspirational-pixels-v6/assets/js/custom.jquery.js (which is the jQuery used on this site), you’ll see there isn’t much there when you take away the comments. This is because in the future I may want to add more code/features.
Another reason to put your code in separate files is so you can just have one piece of code (which is in the separate file), otherwise on a large site you’ll be updating loads of different pages just to fix a spelling error.
Harmony
July 4, 2014 at 9:45 am
Thank you so much for the advice. Really stupid question, I’m sure, but how do I create a separate file? I’ve searched this too, and am not seeming to come up with an answer. Thank you for your help!!
Seb Kay
July 4, 2014 at 9:59 am
It’s not a stupid question at all 🙂
You need to add your code to a separate file with a .js extension. Then link to it like so
Harmony
July 4, 2014 at 9:05 am
Oh! Nicole E, I figured it out!! See where I’ve got the -55px? That makes the tabs go left and align with the content box. Where I have 45px is where you can change the distance between tabs. 45px leavs just a very small gap between 🙂 Only took me an hour to figure out, LOL
.tab-links li {
margin:0px 45px 0px 0px;
float:left;
list-style:none;
}
.tab-links a {
padding:7px 40px;
display:inline-block;
border-radius:10px 10px 0px 0px;
background:#aaaaaa;
font-size:16px;
font-weight:600;
color:#4c4c4c;
transition:all linear 0.15s;
text-decoration:none;
margin:-15px 0px 0px -55px;
}
Harmony
July 4, 2014 at 8:18 am
This was really great, thanks! Similar to Nicole, I can’t figure out how to get rid of the gap before the first tab and left edge of my page. Any guidance would be awesome thanks.
Nicole, you can control the gap between the tabs by changing the number 20px below. However, a small gap is still left, they aren’t completely flush against each other, but it helps 🙂
}
.tab-links li {
margin:0px 20px 0px 0px;
float:left;
list-style:none;
}
Nicole E.
July 3, 2014 at 7:24 pm
The tabs work except there is a gap between the tab links and the content. I tried playing with the padding and margins, but it didn’t seem to work. Do you know how I can get rid of this gap?
Seb Kay
July 4, 2014 at 9:04 am
Hi Nicole, is it possible to create a http://jsfiddle.net of your problem? If not then I’d suggest using the web inspector (both Chrome and Firefox have one). Just right click on the tab links and choose “Inspect Element” or something similar. That will show you any paddings and margin being applied.
Harmony
July 4, 2014 at 9:06 am
See me responses up top which I think will help Nicole 🙂
Seb Kay
July 4, 2014 at 9:08 am
Thank you for your help. This solution also works.
Community FTW! 🙂
Seb Kay
July 4, 2014 at 9:07 am
Sorry I didn’t notice the link 😛
Here it is fixed: http://jsfiddle.net/BxR3E/19/
The problem was the default ul having margin as well as the link parents (li).
Nicole E.
September 18, 2014 at 9:22 pm
Thank you for the tutorial and the help!
Paul
July 3, 2014 at 11:49 am
Nice, thanks for sharing!
Johan
July 3, 2014 at 8:35 am
Awesome tutorial, and great results.
I would like to ask if it is possible to link directly to one of the tabs from another page, something like “page.html#tab2” ?
Seb Kay
July 3, 2014 at 9:18 am
As far as I can tell it would require a little extra coding. If I have the time I’ll try and work up a JSFiddle of this functionality.
Nicole
July 3, 2014 at 8:19 am
I put my code into JSFiddle and it works perfectly fine, but when I put it in my website, the tabs don’t seem to switch. I don’t think it’s linking the tabs. Instead it’s just doing ‘www.url.com/#tab4’.
Nicole
July 3, 2014 at 8:40 am
I have fixed it, thank you for the tutorial. My jQuery references needed to be fixed, so it wasn’t doing the jQuery code correctly.
Ivan Y
July 2, 2014 at 9:34 am
very helpful tutorial. thanks.
for the javascript, it only works for me with :
$(‘.tab-content ‘ + currentAttrValue).show().siblings().hide();
vinayak
July 1, 2014 at 8:05 am
Hi seb,
I copied the code that you fixed in:http://jsfiddle.net/HrC4j/2/ but the tabs are not switching can u help me out pls?
Seb Kay
July 1, 2014 at 10:33 am
It looks as though the tabs are changing but because it’s at the bottom of the JSFiddle the page is scrolling up when the tabs change so you can’t actually see that they’ve changed 🙂
Dennis
June 27, 2014 at 2:46 pm
Hey, thanks for this tutorial, it’s great. Although I was wondering if you knew a way to not change the active tab when the page reloads (ex. submitting a form). So far I’ve tried something like this with jQuery: http://jsfiddle.net/7rA9d/ (just the javascript that’s abit different in my example otherwise your html/css). Would be awesome if you had an idea otherwise thanks for the tutorial! (just linked to jsfiddle for the code, don’t think the update process will work there)
Seb Kay
July 1, 2014 at 10:31 am
For submitting a form your best bet is to submit it with Ajax.
Here is a good place to start with Ajax (if you’re brand new to it). It’s a little old but still worth watching: http://blog.themeforest.net/tutorials/jquery-for-absolute-beginners-day-10/ and here’s the whole series of videos: http://code.tutsplus.com/articles/jquery-for-absolute-beginners-the-complete-series–net-2134
Timmy
June 27, 2014 at 8:23 am
Please i have used your above code but the tabs still does not switch. It remains on active #tab1. What could be the possible cause. I enclosed the jquery code in …Thanks Plus You Doing a great Job helping people like me out..
Seb Kay
June 27, 2014 at 11:53 am
Can you please post your code to http://jsfiddle.net for to look at?
Dan
June 26, 2014 at 4:49 am
Hi Seb,
I copied eveything onto JSFiddle but it is not working on my files, i copied the exact same thing. Is there a need to include a jquery extension?
Seb Kay
June 26, 2014 at 9:46 am
Hi Dan,
In the sidebar to the left you have to select the version of jQuery (in this case 1.10.1). Can you send me a link? If so I’ll take a look for you.
Tricia
June 24, 2014 at 11:17 pm
This really REALLY helped me out. I was using jquery ui tabs, but couldn’t get the tabs to animate like I needed them too. The way you broke this down allowed me to build my own – and throw out the the bloat. Thanks so much!
Seb Kay
June 22, 2014 at 9:17 am
Hi Swat, Rahul and Frank,
I’ll take a look later today and let you know 🙂
Frank
June 20, 2014 at 9:38 pm
I am having the same problem as Swat and Rahul. Any news on a fix?
Seb Kay
June 23, 2014 at 8:28 am
Hey Frank, I’ve just fixed the problem. Can you post a http://jsfiddle.net of your problem if the solution I posted for Rahul doen’t work for you?
Here’s the link to his jsFiddle that I fixed: http://jsfiddle.net/HrC4j/2/
Rahul
June 18, 2014 at 6:28 am
Hello Seb, your Work Was awesome but have a problem with it in the tab section content is not changing when we click on the other here is the link cna you check it out and help me out. http://jsfiddle.net/HrC4j/
Thanks In advance
Seb Kay
June 23, 2014 at 8:26 am
Problem solved: http://jsfiddle.net/HrC4j/2/
The problem was you didn’t put the tab content id (e.g. #tab1 or #tab2) in the tab link href (e.g.
href="#tab1").Good luck coding! 🙂
Swat
June 17, 2014 at 8:20 am
Hey seb.
Thanks for the tab script but i have a problem. When i click on another tab, the active tab isn’t changing. Also i don’t have much knowledge about Jquery or CSS am just beginning so please give me a solution in simple terms.
Cheers 🙂
Seb Kay
June 17, 2014 at 9:04 am
Hi Swat, can you post your code to http://jsfiddle.net for me to look at? It’s probably just a small bug in the code. I hate the small bugs, they’re always harder to find 🙂
jaine
June 17, 2014 at 8:13 am
I am wondering, how could I have the tabs scroll to top when clicked?
Seb Kay
June 17, 2014 at 9:02 am
Do you mean if the tab content is longer than the current page?
jaine
June 18, 2014 at 6:31 am
Yes, if I have the tabs contents in a way that when they overflow the certain amount of pixels, the content becomes scrollable. However, if I scroll down, and then change the tab, it isn’t at the top of the new tab but instead it is scrolled down the same amount as the previous tab was.
Emmanuel
June 15, 2014 at 1:35 pm
Hi Seb,
I was wondering if you forgot my request 😉 , I’m trying to learn some Javascript myself, and came with conclusion to add an If/else statement to disable the active tab when loading the page, and to Add Toggle the tabs to be able to deactivate them when clicking on them again.
No worries for the delay, but it would be amazing to see those features 😀
Thanks again for the tutorial!
Seb Kay
June 16, 2014 at 9:28 am
Hey Emmanuel,
Really sorry for the delay. Work has been crazy lately. I’ll see what I can do in the next couple of days. Keep up the awesome work and never stop learning 🙂
Emmanuel
June 16, 2014 at 3:00 pm
Hey,
That’s alright, so far you’ve been of a immense help! And it helped me to start my Javascript learning.
Sites and work like yours is what makes the internet awesome!
Cheers!
George
June 15, 2014 at 7:33 am
Thanks a lot man … the best part i liked is the description of each part really helping me
THanks again 🙂
vinh
June 12, 2014 at 10:58 am
thanks a lot. I’m a new guy. Your tutorial is very easy to understand.
udaykiran
June 12, 2014 at 6:16 am
An excellent example on tabs using html, css and jquery. Easily understood.
Thanks for the example. 🙂
Seb Kay
June 11, 2014 at 8:49 am
I’ll be taking a look later on today to help you all out 🙂
ramsey
June 10, 2014 at 9:16 am
my tabs are not changing, please help
my code is here http://jsfiddle.net/ramsey/dpLNs/
ishadutta Yadav
June 10, 2014 at 1:20 am
I copied my code here .http://jsfiddle.net/cffcX/.
ishadutta Yadav
June 10, 2014 at 1:14 am
I need to implement tab feature with Rails . i copied your code and added in application layout. In between tab ocde I added a session variable to store a value. I have 2 tab only , But when I click on tab1, rails part of tab2 also executed . Is there any Class active variable which I can use if current class is active class then only Trigger rails code. My Code is –
User Rule
All Rule
Tab #1 content goes here!
alert(“At tab 1”)
Anonymous1
Anonymous
Tab #2 content goes here!
alert(“At tab 2”)
<
Eillya-Mari Kocumba
June 9, 2014 at 11:00 pm
Strangely it doesn’t seem to work at all on jsfiddle even though it works on my site but here it is…
http://jsfiddle.net/GTwC7/
Thanks Again
Seb Kay
June 9, 2014 at 10:18 am
Hi Eillya-Mari, It’s most likely a CSS float problem. Can you post a http://jsfiddle.net for me to look at?
Eillya-Mari Kocumba
June 8, 2014 at 11:56 pm
I’ve implemented this, but because I have too many tabs for one row, they wrap around–which is fine but they move around instead of stay in place. Any idea how to fix this? Thanks!
Seb Kay
June 5, 2014 at 8:05 pm
Thank you Ludo, means a lot!
Elina and Emmanuel, I haven’t forgotten about you. Had some life related troubles but will be back at work tomorrow to sort out your requests 🙂
Ludo
June 5, 2014 at 6:16 pm
Definitely one of the best tutorials I’ve seen. Thank you and good luck with your projects.
Elina
June 3, 2014 at 2:44 pm
I have no new ideas, so it would be great if you can look at it or recommend other responsive slideshow with thumbnails which work with tabs.
Emmanuel
June 3, 2014 at 12:26 pm
That’s excellent! Thanks for all the great help!
Seb Kay
June 3, 2014 at 11:23 am
Hi Emmanuel. Sorry I thought I’d answered you, my mistake!
It would take a little editing to the code but yes I’m sure it can be done. I’ll create a jsFiddle later on and post it here if that’s good with you? 🙂
Emmanuel
June 3, 2014 at 11:10 am
Hi Seb,
Any update for my request :D???