How to Make a Search Results Filter in WordPress
- 4 min read

By default, the WordPress search does a pretty great job. It’s not the best one out there, hence why so many opt for using Google search instead. However, with a little know-how, you can make it more powerful by adding a search results filter.
Although it has a few flaws, like how it doesn’t search post meta by default, most of the time it does a good job of returning what you’re after.
Sometimes though you’ll want the ability to add a filter to the results so the user has more control over what they get. Doing so is actually easier than you might imagine. All it takes is a little PHP and some know-how.
In this tutorial you’ll learn how to make a WordPress filter for search results.
Table of Contents
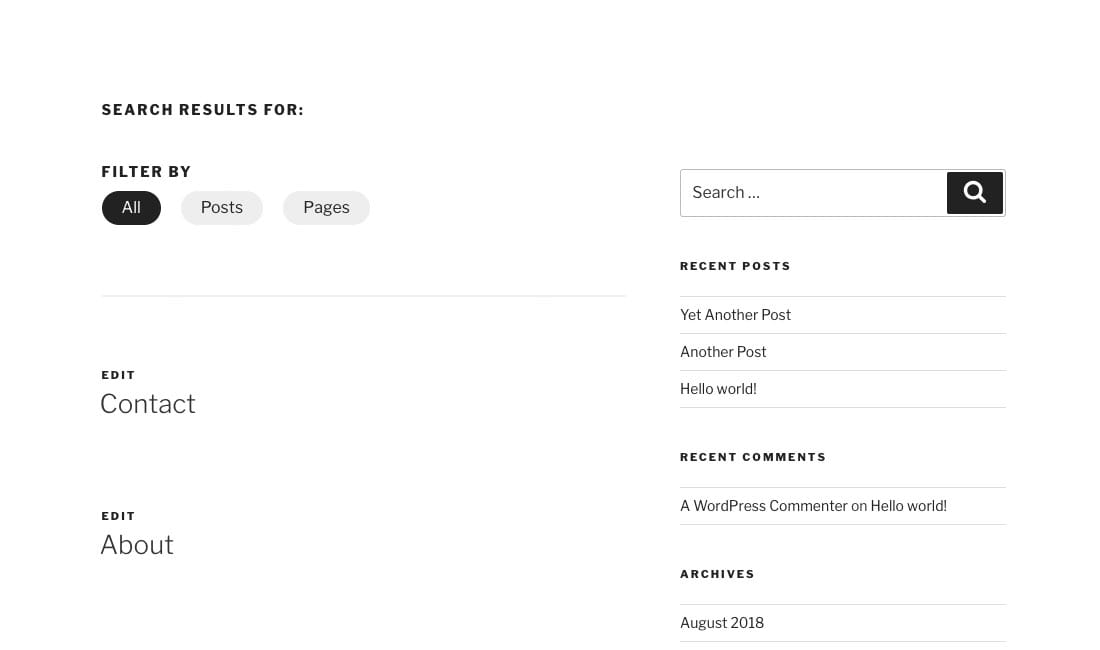
Final Result
1.) The HTML
For this tutorial, we’re going to be using the Twenty Seventeen theme from the WordPress team. Once you’ve got a copy open in your code editor of choice you’re good to go.
Start off by finding the file search.php and going to line 26. Just below that, let’s set up the HTML structure of our filter menu.
<h3 class="page-title">
	Filter By
</h3>

<nav class="page-nav">
	<a class="current" href="#">
		All
	</a>
	<a href="#">
		Posts
	</a>
	<a href="#">
		Pages
	</a>
</nav>
As you’ll see from the above, we’re using a standard nav element with some links inside it.
We’re also adding a title at the top using a standard class from the Twenty Seventeen theme, page-title.
2.) The CSS
The CSS is pretty straightforward with nothing too crazy going on. The Twenty Seventeen theme is already handling most of the spacing and typography for us.
Open up the style.css file, scroll right to the bottom and add the following CSS:
.page-nav {
	margin-bottom: 70px;
	padding-bottom: 70px;
	display: flex;
	flex-wrap: wrap;
	border-bottom: 2px solid #eee;
}

.page-nav a {
	padding: 5px 20px;
	border-radius: 1000px;
	background: #eee;
}

.page-nav a:hover {
	background: #ddd;
}

.page-nav a.current {
	background: #222;
	color: #fff;
}

.page-nav a:not(:last-child) {
	margin-right: 20px;
}
The only thing to note is the use of .page-nav a:not(:last-child). All this means is “apply to all anchor links except the last one”.
3.) The PHP
Now for the fun bit, the PHP!
The first thing you’ll need to do is open up the filefunctions.php. You can add this code wherever you want, but I recommend adding it at the bottom with some comments to separate it from the main theme code.
We’ll first be creating a function to apply the .current CSS class to our nav links. To do that we need to create a new function called ip_search_filter_item_class();.
Notice the use of the prefixip_ at the start of the function name. This is a best practice as you may have other plugins running which use search_filter_item_class();, so prefixing it brings the chance of that down considerably.
function ip_search_filter_item_class($passed_string = false) {

}
Next, we need to get the post type that will be passed as a query string (don’t worry, I’ll explain that in a few moments) and check it matches what’s passed to the function, like so:
$post_type = (isset($_GET['post_type']) ? $_GET['post_type'] : false);

if($passed_string == $post_type) {
	echo 'current';
}
Before we write the main function, let’s add this code to our HTML, like so:
<nav class="page-nav">
	<a class="<?php echo (!isset($_GET['post_type']) ? 'current' : false); ?>" href="#">
		All
	</a>
	<a class="<?php ip_search_filter_item_class('post'); ?>" href="#">
		Posts
	</a>
	<a class="<?php ip_search_filter_item_class('page'); ?>" href="#">
		Pages
	</a>
</nav>
The shorthand PHP statement on the “All” link just checks if our variable$_GET['post_type] is set, if not then we can safely assume we want to see all posts and pages.
Now let’s add the correct URLs to those links:
<nav class="page-nav">
	<a class="<?php echo (!isset($_GET['post_type']) ? 'current' : false); ?>" href="<?php echo home_url(); ?>?s=<?php echo get_search_query(); ?>">
		All
	</a>
	<a class="<?php ip_search_filter_item_class('post'); ?>" href="<?php echo home_url(); ?>?s=<?php echo get_search_query(); ?>&post_type=post">
		Posts
	</a>
	<a class="<?php ip_search_filter_item_class('page'); ?>" href="<?php echo home_url(); ?>?s=<?php echo get_search_query(); ?>&post_type=page">
		Pages
	</a>
</nav>
If you look closely you’ll see we’re just getting the home URL, adding the parameter?s= and applying the search query to the end.
The important bit is where we append &post_type=page to make sure we filter by the correct post type. You should end up with a URL like so:
http://localhost:8888/wordpress/?s=test&post_type=pageIf you test out the post link it’ll actually work because WordPress has built-in support for it. However, the page link won’t so let’s fix that in the following function.
We’ll start off by creating a filter for the results query:
function ip_search_filter($query) {

}

add_filter('pre_get_posts', 'ip_search_filter');
Then we’ll set up some basic stuff like returning the query and checking we’re not running our code in the admin area:
function ip_search_filter($query) {
	// Check we're not in admin area
	if(!is_admin()) {

	}

	// Return query
	return $query;
}

add_filter('pre_get_posts', 'ip_search_filter');
Now we need to make sure we’re affecting the correct query, in this case, it’s the main search query:
// Check if this is the main search query
if($query->is_main_query() && $query->is_search()) {

}
The last step is to get our $_GET['post_type'] variable, sanitize it to make sure it’s safe and apply it to the current search query:
// Check if $_GET['post_type'] is set
if(isset($_GET['post_type']) && $_GET['post_type'] != '') {
	// Filter it just to be safe
	$post_type = sanitize_text_field($_GET['post_type']);

	// Set the post type
	$query->set('post_type', $post_type);
}
That’s it! The PHP is written and in place. If you’re not sure where to put the final code, go to the next section where you can grab the completed HTML, CSS and PHP.
4. Final Code
The HTML
<h3 class="page-title">
	Filter By
</h3>

<nav class="page-nav">
	<a class="<?php echo (!isset($_GET['post_type']) ? 'current' : false); ?>" href="<?php echo home_url(); ?>?s=<?php echo get_search_query(); ?>">
		All
	</a>
	<a class="<?php ip_search_filter_item_class('post'); ?>" href="<?php echo home_url(); ?>?s=<?php echo get_search_query(); ?>&post_type=post">
		Posts
	</a>
	<a class="<?php ip_search_filter_item_class('page'); ?>" href="<?php echo home_url(); ?>?s=<?php echo get_search_query(); ?>&post_type=page">
		Pages
	</a>
</nav>
The CSS
.page-nav {
	margin-bottom: 70px;
	padding-bottom: 70px;
	display: flex;
	flex-wrap: wrap;
	border-bottom: 2px solid #eee;
}

.page-nav a {
	padding: 5px 20px;
	border-radius: 1000px;
	background: #eee;
}

.page-nav a:hover {
	background: #ddd;
}

.page-nav a.current {
	background: #222;
	color: #fff;
}

.page-nav a:not(:last-child) {
	margin-right: 20px;
}
The PHP
function ip_search_filter_item_class($passed_string = false) {
	$post_type = (isset($_GET['post_type']) ? $_GET['post_type'] : false);

	if($passed_string == $post_type) {
		echo 'current';
	}
}

function ip_search_filter($query) {
	// Check we're not in admin area
	if(!is_admin()) {
		// Check if this is the main search query
		if($query->is_main_query() && $query->is_search()) {
			// Check if $_GET['post_type'] is set
			if(isset($_GET['post_type']) && $_GET['post_type'] != '') {
				// Filter it just to be safe
				$post_type = sanitize_text_field($_GET['post_type']);

				// Set the post type
				$query->set('post_type', $post_type);
			}
		}
	}

	// Return query
	return $query;
}

add_filter('pre_get_posts', 'ip_search_filter');
Ultimately the WordPress search does a pretty decent job and most of the time is fine. However, there’ll be times where you’ll want people to have a little more fine-tuned control over the results they get.
I’ve made sure to write the PHP in such a way that you can add to it for more complex filtering options, should you need to.
If you’ve got any questions, please leave me a comment below!
X
December 14, 2022 at 6:48 am
I copy any paste your code exactly, but it’s apparently not able to get the search query so instead it just appends the php code itself to the URL and no search results show of course.
Tibow
December 20, 2021 at 5:54 pm
Perfect tutorial thank you !
Brandon
December 10, 2019 at 4:11 pm
First off–really helpful. Exactly what I wanted for the most part. Thank you.
However, I’m trying to apply this to a number of different post type taxonomies. I have Posts, Pages, and Resources (Case studies, videos, webinars, & white papers). All of the filtering I have working fine with just appending to the URL query like:
&post_type=resource&resource_type=case-studies”
But when it comes to dynamically setting the current status, that’s where I’m not sure how to make this more granular. If I set all post_type to resource, then it shows all as active. How can I modify this so that I can use the current class more specifically?
Thanks again!
Kristien Harris
July 12, 2019 at 12:11 pm
Hey Seb this was great and thanks. I have one question. What if you want the link to bring back two post types including a custom post type? for example. www.asite.com/?Sfilter&post_type=page&post_type=myposttype. Is that possible with this method? Trying to work it out now. Any help would be appreciated =)