Creating a Dropdown Menu with HTML & CSS
- 3 min read
Today we’re going to look at how to make an HTML and CSS dropdown menu. No JavaScript or jQuery required!
Take a look at the demo to test it out and see what the end result looks like. The below HTML and CSS dropdown menu relies on z-index for some of the functionality, which can sometimes trip up beginners. If you get stuck, don’t hesitate to ask me a question.
You might also like: Creating a Responsive Menu with HTML, CSS & jQuery
Table of Contents
1.) HTML Structure
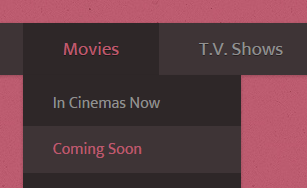
Finished HTML
<div class="menu-wrap">
<nav class="menu">
<ul class="clearfix">
<li><a href="#">Home</a></li>
<li>
<a href="#">Movies <span class="arrow">▼</span></a>
<ul class="sub-menu">
<li><a href="#">In Cinemas Now</a></li>
<li><a href="#">Coming Soon</a></li>
<li><a href="#">On DVD/Blu-ray</a></li>
<li><a href="#">Showtimes & Tickets</a></li>
</ul>
</li>
<li><a href="#">T.V. Shows</a></li>
<li class="current-item"><a href="#">Photos</a></li>
<li><a href="#">Site Help</a></li>
</ul>
</nav>
</div>Ek Mukta Font
If you would like to use the same font as I’ve used you need a link to it in the header.
<link rel="stylesheet" type="text/css" href="http://fonts.googleapis.com/css?family=Ek+Mukta">Wrapper and Nav
We start off with a wrapper div and give it a class of menu-wrap. Inside that wrapper, we put a nav and give it a class of menu.
<div class="menu-wrap">
	<nav class="menu">
		<!-- NAV -->
	</nav>
</div>
First Unordered List
The first unordered list we’ll be using needs a class of clearfix (more on why when we write the CSS). Inside it, we’ll put a couple of links to act as menu content.
<ul class="clearfix">
<li><a href="#">Home</a></li>
<li><a href="#">Movies <span class="arrow">▼</span></a></li>
<li><a href="#">T.V. Shows</a></li>
<li class="current-item"><a href="#">Photos</a></li>
<li><a href="#">Site Help</a></li>
</ul>Nested Dropdown Menu
For the dropdown menu, we put another unordered list inside the one we already have and the HTML code is complete.
<ul class="clearfix">
<li><a href="#">Home</a></li>
<li>
<a href="#">Movies <span class="arrow">▼</span></a>
<ul class="sub-menu">
<li><a href="#">In Cinemas Now</a></li>
<li><a href="#">Coming Soon</a></li>
<li><a href="#">On DVD/Blu-ray</a></li>
<li><a href="#">Showtimes & Tickets</a></li>
</ul>
</li>
<li><a href="#">T.V. Shows</a></li>
<li class="current-item"><a href="#">Photos</a></li>
<li><a href="#">Site Help</a></li>
</ul>2.) CSS Styling
Finished CSS
body {
	background:#bf5c71 url('body-bg.jpg');
}

.clearfix:after {
	display:block;
	clear:both;
}

/*----- Menu Outline -----*/
.menu-wrap {
	width:100%;
	box-shadow:0px 1px 3px rgba(0,0,0,0.2);
	background:#3e3436;
}

.menu {
	width:1000px;
	margin:0px auto;
}

.menu li {
	margin:0px;
	list-style:none;
	font-family:'Ek Mukta';
}

.menu a {
	transition:all linear 0.15s;
	color:#919191;
}

.menu li:hover > a, .menu .current-item > a {
	text-decoration:none;
	color:#be5b70;
}

.menu .arrow {
	font-size:11px;
	line-height:0%;
}

/*----- Top Level -----*/
.menu > ul > li {
	float:left;
	display:inline-block;
	position:relative;
	font-size:19px;
}

.menu > ul > li > a {
	padding:10px 40px;
	display:inline-block;
	text-shadow:0px 1px 0px rgba(0,0,0,0.4);
}

.menu > ul > li:hover > a, .menu > ul > .current-item > a {
	background:#2e2728;
}

/*----- Bottom Level -----*/
.menu li:hover .sub-menu {
	z-index:1;
	opacity:1;
}

.sub-menu {
	width:160%;
	padding:5px 0px;
	position:absolute;
	top:100%;
	left:0px;
	z-index:-1;
	opacity:0;
	transition:opacity linear 0.15s;
	box-shadow:0px 2px 3px rgba(0,0,0,0.2);
	background:#2e2728;
}

.sub-menu li {
	display:block;
	font-size:16px;
}

.sub-menu li a {
	padding:10px 30px;
	display:block;
}

.sub-menu li a:hover, .sub-menu .current-item a {
	background:#3e3436;
}
Base Styling
We start the CSS with some base styling by setting a page background colour and setting up a clearfix. Don’t worry if you don’t have the background image it’s only a simple texture. You can grab it from the demo if needed.
The clearfix will stop an annoying bug where, if a parent element has a floated child element, it will disappear.
body {
	background:#bf5c71 url('body-bg.jpg');
}

.clearfix:after {
	display:block;
	clear:both;
}
Menu Setup
Now we need to set up the outline of the entire menu and style a few ‘global’ elements (two or more elements with the same styling).
/*----- Menu Outline -----*/
.menu-wrap {
	width:100%;
	box-shadow:0px 1px 3px rgba(0,0,0,0.2);
	background:#3e3436;
}

.menu {
	width:1000px;
	margin:0px auto;
}

.menu li {
	margin:0px;
	list-style:none;
	font-family:'Ek Mukta';
}

.menu a {
	transition:all linear 0.15s;
	color:#919191;
}

.menu li:hover > a, .menu .current-item > a {
	text-decoration:none;
	color:#be5b70;
}
Dropdown Arrow
The arrow by default is quite large so we make the font-size smaller and remove the line-height. If we leave the default line-height the menu styling may become affected.
.menu .arrow {
	font-size:11px;
	line-height:0%;
}
Top Level Menu
To style just the top-level menu we can use the > symbol. It states that only the first child element preceding the parent will get the specified styling. E.g. .parent > child, only the top-level .child will get the styling whereas any children of .child that are also called .child won’t.
We also set a position:relative; on the parent list item in case it has a child (aka a submenu).
/*----- Top Level -----*/
.menu > ul > li {
	float:left;
	display:inline-block;
	position:relative;
	font-size:19px;
}

.menu > ul > li > a {
	padding:10px 40px;
	display:inline-block;
	text-shadow:0px 1px 0px rgba(0,0,0,0.4);
}

.menu > ul > li:hover > a, .menu > ul > .current-item > a {
	background:#2e2728;
}
Bottom Level Menu
Here’s the fun part…and also the main point of this article. To style the sub menu we first need to position it. We do that with position:absolute;. By setting a percentage as the top instead of a fixed pixel value the submenu will always be positioned exactly at the bottom of its parent.
We also add z-index:-1;. This pushes the dropdown menu behind the everything else on the page, including the body element.
There’s also no opacity, this is so the submenu can fade in by using a transition.
For the transition you may want to use prefixed values if you’re targeting older browsers, however, for the purposes of this tutorial, we’ll be aiming at Firefox and Webkit based browsers (Webkit browsers include Google Chrome and Opera).
You may also wonder what the rgba(0,0,0,0.2) is. It states a colour (Red, Green and Blue) then the opacity (Alpha), in this case, it’s 20% (0.2)
/*----- Bottom Level -----*/
.sub-menu {
	width:160%;
	padding:5px 0px;
	position:absolute;
	top:100%;
	left:0px;
	z-index:-1;
	opacity:0;
	transition:opacity linear 0.15s;
	box-shadow:0px 2px 3px rgba(0,0,0,0.2);
	background:#2e2728;
}
To get the dropdown menu showing on hover we need to add a line that states when hovering over a list item, show its children. This has no effect on empty list items as they have no children to show.
.menu li:hover .sub-menu {
	z-index:1;
	opacity:1;
}
The rest is the styling of the submenu list items and anchor links.
.sub-menu li {
	display:block;
	font-size:16px;
}

.sub-menu li a {
	padding:10px 30px;
	display:block;
}

.sub-menu li a:hover, .sub-menu .current-item a {
	background:#3e3436;
}
Conclusion
Some of the CSS used may be a little hard to wrap your head around at first, especially if you’re a beginner. If you need help in any way create a JSFiddle of your code and post the link to it in the comments.
Thank you for reading and I look forward to chatting with you below!
You might also like: Creating an Accordion with HTML, CSS & jQuery
Janine Rawnsley
November 1, 2017 at 9:58 am
Thank you so much for this – great example with fab explanations. I’m a little stuck with my implementation though – I have to change .menu to a fixed position to get the dropdowns to overlap a sibling div beneath. This works but makes the dropdown panels fade in when you mouse over the panel itself rather than just the menu entry at the top. Any ideas for a quick win?
Tony
September 16, 2017 at 6:19 am
Thanks so much for making this tutorial!!!!!!
It really helped me out.
But I’d like to ask, can you please show me how to make a big title at the top-left corner of the website, just above the drop-down menu?
That’d be greatly appreciated.
Thanks again,
Tony
Fariba
July 5, 2017 at 11:00 am
thanks for this article
I want to responsive this menu
can you help me?
thanks again
edmond january
May 30, 2017 at 11:09 am
i am a beginner and i would like know how i can fit in my logo in your code of the above menu html/css
thank you
edmond
South Africa
Xavier King
February 26, 2017 at 11:06 pm
Hi, I am trying to finish off my menu and headings, however, when I resize the browser window everything moves to the right and will not center or stay where I want it too. Any help would be much appreciated. HTML and CSS below.
Roger
February 7, 2017 at 11:31 pm
How do you change the color of the text before hovering over it? It’s a gray color but I don’t see the HEX code for it in the CSS of HTML.
Also the are a number of links to CSS files in the source code of the demo page. One goes to a main.css.
Without that, it doesn’t work completely. The gray text shows as underlined.
With it, the underlines go away, but then a huge black rectangular box appears a the top of the page. I don’t know how to get ride of that, without getting rid of the man.css and then the gray text shows as underlined again.
I’m just trying to isolate the menu piece.
Also how to you align the text in the menu-wrap div. I want to center the whole div and center and equally space out the links in that div.
Thanks .. great stuff.
saurav mshra
February 3, 2017 at 8:31 pm
Sir .i try create nav bar with dropdown. I hw an slider just below that but I want my nav should overflow on slider .but it do not working . Any idea how it will wok
..
Alan
January 12, 2017 at 9:45 pm
Hi
Great Drop down Menu but how do I incorporate a footer so I can enter some text
And also I have added a few more menus at the end but when I view it, these extra menu item are wrapped round and appear on the next line,
Hope you can help
Mohit Joshi
January 10, 2017 at 6:41 am
I have tried the above code as it is but it is not showing the given look and feel. I am unable to find the demo file that can be extracted for running the code. Kindly mail me the link of that file if available.
Simha
November 23, 2016 at 1:17 pm
This article helped me a lot, thank you! with
.menu > ul > li:hover > a, .current-item > a{
background:#2e2728;
}
does “a” mean the first dropdown menu, or something else? Thank you
Karen
October 28, 2017 at 9:34 pm
a means active and # means id. So when you see a href=”#”, it means go to the item with the id. If you want it to actual go to an item’s id, you have to have given the item an id like id=”coolpage” first. Then you can use the a href=”coolpage” to actually go to the cool page, assuming that the id exists on the same html page. If you assign an actual web address to the href like a href=”http://somewebsite.com”, the item will become a link to another web page when clicked.
Dmitry
September 11, 2016 at 8:11 pm
For everyone wondering why it’s not working, and why background of menu dissapers:
add content: “”; to your clearfix class, like this:
.clearfix::after {
content: “”;
clear: both;
display: block;
}
sanchi
August 19, 2016 at 1:17 am
can you send or show us the whole code in order,i am stuck there 🙁
Arjun
April 14, 2017 at 4:01 pm
yes u can
Karen
October 28, 2017 at 9:42 pm
Most browsers have Developer tools that you can use to view the source code on a web page. For example, Google Chrome’s tools appear when you select Ctrl + Shift + i. When you see the tools window pop-up on the side of your screen, click on the “Sources” tab. This will bring up another window with a list of the resources used to create a web page. On this site and for this tutorial, the file is called “comment-page-3”.
Victor
July 29, 2016 at 8:47 am
Hey,
I am new to HTML and CSS. Why won’t clicking on the tabs take me to that tab? Even in the Demo it just stays on the “photos” tab.
Thanks for your help,
Victor
Karen
October 28, 2017 at 9:25 pm
For navigation links to work, you need to change the a href=”#” to a href=”http://www.google.com”, substituting the actual web address of your link for the google address. The “#” takes you to the existing page you are on, so it doesn’t go any where. If you want to link to an item on the same page, you can use its id as the href=”[value]”. So, suppose you have a div section on your page with the id of “partTwo”. You would type a href=”partTwo”.
James Birrell
June 29, 2016 at 10:48 am
I like this menu but would prefer the sub-menu to open and close on click rather than hover. At present the sub-menu tends to open when I’m trying to open a menu below. NB I’m working offline. The current menu on my site will be replaced.
James
Lachlan Eavestaff
May 31, 2016 at 2:33 am
May I ask, is this code open source and free to use?
Jennt
May 22, 2016 at 8:38 am
The background color for the menu-wrapper div wasn’t working for me until I comment (and later remove) the float rule to the list items of the main menu.
.menu > ul > li {
/* float:left; */
display:inline-block;
position:relative;
font-size:19px;
Now it works just fine. Nothing changed, except now I can actually set the background color of the div
george
May 6, 2016 at 5:09 pm
Hello, when i write this rule below
the ul
.menuand.menu-wrapheight becomes 0https://jsfiddle.net/5zg9zd5h/
Lavanya Kavarthapu
May 6, 2016 at 2:01 pm
Hi Mr Kay
I am trying to implement submenu for my webpage. I followed your tutorial but its not working. Could you please help.
Please find the code
Below is style sheet
Karen
October 28, 2017 at 9:19 pm
The html of this code needs to be corrected. HTML tags need starting and ending tags. For example or . The biggest issue I can see is missing tags. You have used multiple end tags without starting with any start tags. That is one reason the code does not work. Each item within an unordered list needs to be wrapped in the and tags in order to be rendered by the browser as list items. So, for a list of items in a class called foods, you would put:
bacon
apple
cheese
watermelon
Another great resource for learning basic HTML and CSS coding is w3schools.com.
Zacharie
April 14, 2016 at 4:13 am
Dear Colleague,
I am having difficulty using the dropdown html+css code you posted. The code you posted are separate in two so how to merge them in to one code listing? should I add the CSS code right after completing the HTML code. That is to say after the ? and where shoud I add also the link background?
do you have the complete one list code if yes could you send as attached file? I really appreciate your time and help that will be given to me
Best regards
Zacharie
Jeff C.
April 1, 2016 at 4:49 am
Fun tutorial but can’t get the background color to show up in the nav. Have you found the solution for this?
Michael M.
August 30, 2016 at 2:22 pm
In CSS it says:
.clearfix:after {
display:block;
clear:both;
}
Change it to:
.clearfix:after {
display:block;
clear:both;
content:’ ‘;
}
This should fix your problem 🙂
Yuukiss
March 18, 2016 at 3:41 pm
Hello, can you help me with the CSS program for a sub-sub-menu? like a cascading drop down Because i have been trying it for 2 days now and i cant make it work..
Rizwan Jin
March 15, 2016 at 9:09 am
Hi! I used your idea and it was working perfectly at first. However, now its just not working. The menu is displaying fine but the links are not active and the submenu doesn’t even appear. I don’t understand what happened? Please see https://jsfiddle.net/r2fw0sfo/2/#&togetherjs=58PqPCpLjn (https://jsfiddle.net/r2fw0sfo/2/) and let me know if you see where I have gone wrong.
Thanks in advance!
kavitha n
March 9, 2016 at 6:35 am
Hi,I have created that yes group website in that abo us page i gave dropdown.but when i have seen in the result in home page about is not working.please give me a solution.
HajAhmad
February 9, 2016 at 5:52 am
THANKS ALOOOOOOOOOOT! it was really awesome and i Learned LOTS of things from it. tnx again!
Philemon Nashon
February 7, 2016 at 6:32 am
Hello there This Article was very helpful to me Thank you guys for creating this tutorial now in my blog there i sub menus but the thing is im a beginner I dont know how to put a content in any of that sub menu Any one there who can help me i will so grateful Guys
SS
December 28, 2015 at 10:22 pm
Ah I got this drop down working just the way I want it in Chrome – even getting it to be responsive. But it all breaks in Firefox – any ideas?
https://jsfiddle.net/z4f0v6me/
Melissa
December 16, 2015 at 7:25 pm
Hi, I’m having trouble adjusting the color of the words in the menu when the mouse is hovering over. It’s gray but I need it to be white. Having trouble finding the portion of the CSS where I could fix this.
Halorie
December 7, 2015 at 10:34 am
Hi there Seb Kay!
I am very, very, very, very, VERY SUPER GRATEFUL that you’ve created this little tutorial. I am taking a beginner web development course and this has been an extremely helpful resource! Thank you so much for sharing your knowledge with the world! 😀
Go forth and continue to be awesome!
Vikshahyy
December 5, 2015 at 1:47 am
You should have put the whole script in the tutorial when you finished teaching
Dayvison Willian
November 26, 2015 at 1:57 pm
Guy you are simply the best, thanks.
Thomas White
November 20, 2015 at 3:44 pm
I’ve been working on a website in my website development class on Adobe Dreamweaver CS6, I wanted to be able to continue working on it outside of school so I migrated all the html, css, and js files to my iPad in a mobile html editor I updated all the file paths and ran into an error with my Spry menu bar drop down submenus. The css code was made on a computer and requires a mouse pointer to activate the submenus. I’m not extremely edchacated in css so I don’t know what I need to change to make the Spry menu bar mobiliy compatible. Please help me
Jojo Jonah
November 3, 2015 at 7:24 pm
How can i change it from it working on hover to only work on click?
Carlos
October 29, 2015 at 1:43 am
I am a cs student that had neglected learning front end development, until i decided to give html and css a try and boy is it fun!
I tried this very same code, into a site i am working with and it worked like a charm, did some minor modifications to get the colors match my configuration but other than that its awesome.
I am not gonna lie, i did not understand much of what is going on, can someone explain me more or less how is the drop down happening? I do not need detailed explanations, just walk me through what is going on from a high level perspective. Much apreciated. Excelent site 10+
pavan
October 18, 2015 at 12:27 pm
its really helpfull but i dont know the head part can u please give it in html coz i dont know css fast please.
sholamakosa
October 13, 2015 at 9:48 pm
pals the code is not working pls what can i do to have a positive result?
DeveloperX
October 6, 2015 at 3:33 pm
Great tutorial to learn the basics of CSS drop down menus which is a very important navigation system.There are many good books that do not cover drop down menus. I tried making one myself and it did not go well. Thank You very much for your help.
To the people who said that the code has limitations.Why don’t you try improvising it?
John
October 6, 2015 at 2:44 pm
what does the ▼ by the movies link mean and do?
Dennis
September 28, 2015 at 3:18 pm
Oh thanks but now I don’t want the menu located like “center”position of the bar, I want them to stick to the lefter most side. I don’ t know how I can do it. Please help. I feel very uncomfortable now.
Nav
September 25, 2015 at 5:55 am
I can not make menu on my blog. I have no knowledge of html or CSS, but i want it to be placed on my blog. Your work is very impressive.
Please help me. Thank you in Advance. I will thank you later also. 🙂
Alanna McEntegart
September 23, 2015 at 2:24 pm
I’m creating a website using dreamweaver for a school project. So my main menu headings are Home, Treatments, Offers, Vouchers and Contact. I wanted the treatment one to be a drop down menu (I think that’s what it’s called) so that the user can then choose, for example, waxing, makeup, spray tan or massage and then when they click on that option (from the drop down menu) that option would be linked to the corresponding page. I tried this code from this article but it didn’t give me a drop down menu. Can anyone give me some advice??
Aman
January 8, 2016 at 11:30 am
Alanna go to this link to get a beautiful template using html & css {http://www.free-css.com/free-css-templates/page193/munter#shout} its a beautiful template which I’m using for my website designing too.Its a really beautiful if you’ll see it you like to take it and one more thing its free.
larry
September 21, 2015 at 10:29 pm
Code doesn’t work in that it will not overlap a table below. Likewise the dropdown doesn’t work in an of itself.
I did a straight copy paste. on a new page. I had really high hopes for this!
Larry
September 21, 2015 at 3:12 am
Doesn’t work if it drops down onto/over a table.
Saiyam
September 4, 2015 at 4:00 pm
code is not working
Shannon
September 4, 2015 at 12:22 am
Thank you so much for sharing this code, it helped me so much!! Now my drop down menu looks great!
sgt_genius
August 28, 2015 at 7:47 pm
I’ve got some problems, getting the bar in the center of the screen.
The code was changed a bit, but the main functions are working now.
Would be very kind if s.o could tell my the parts of the css (or even html) code i need to change.
San
August 12, 2015 at 1:40 pm
I have the bar in the center of my page, rather than going all the way across, but when I hover over the first word, for example the word home…my color extends to far to the left and the bar height is smaller. Can you tell me why it does that? How can I fix it?
sajjad
August 10, 2015 at 2:14 am
i dont know about css..
in html code only 3 to 4 classes are used. but in css many classed u have made. will u help me about it… plz i will wait for ur rply. if u reply me at my email address,, i will be thankful to you. so please.
[email protected]
AJ
July 29, 2015 at 8:44 pm
how do you keep the main menu text color active when on that page? like if i went to the tv show in the menu and i wanted the text to stay that pink color to show thats the page your on?
Craig Anderson
July 25, 2015 at 6:19 am
Hello
I have followed your tutorial, but I would like to make the menu bar go all the way across the screen, and be able to colour it. I can’t find the correct colour value to change to make this possible?
Regards,
Craig
Elliott Amrie
July 28, 2015 at 8:42 am
it would be under the .menu-wrap background-color: #3e3436 and to change the width of the menu that is under the .menu
Elissa
July 6, 2015 at 6:55 pm
How can you make the hover color display across the whole box when you mouse over a link instead of just the part of the word that is associated with the link? Not sure if I am making it clear. It works with your code, but not with mine.