WordPress Custom Post Types and Taxonomies for Beginners
- 5 min read
After you’ve been developing with WordPress for a while you’ll come across custom post types and taxonomies. However it can be pretty confusing as to what they are and how to use them.
I’ve put together this guide to help anyone looking to get started with custom post types and taxonomies, which can lead to more advanced WordPress themes.
Please get in touch via the comments below if you need help!
Table of Contents
- What are custom post types?
- What are custom taxonomies?
- Setting up the ‘Movies’ post type
- Setting up the ‘Movie Genre’ taxonomy
- Using WordPress’ built-in menus
- Finishing up
What Are Custom Post Types?
In WordPress you have five default post types, posts, pages, attachments, revisions and nav_menu_item. We mostly think of post types as being either a post or a page, however custom post types and taxonomies give us some tools to greatly enhance our themes.
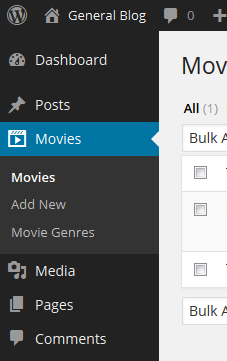
A custom post type is just what it sounds like, a user-created post type and it can be anything you want. In this tutorial we’ll be creating a post type of “Movies”. Each movie can be added to a new section in the WordPress back-end and so won’t be filed under posts or pages.
See below and notice the non-standard “Movies” link:
What Are Custom Taxonomies?
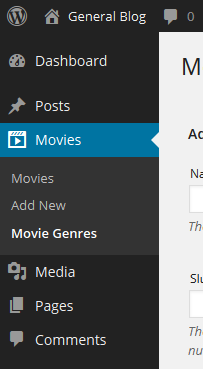
A taxonomy is simply a tag or category. The simplest way of describing a taxonomy is by saying that it categorises information. WordPress already has its own Tags and Categories but we want something more specific that will apply to our custom post type of ‘Movies’. What we want is a way of classifying each movie. So in this tutorial we’ll be creating a ‘Movie Genre’ category type.
Once created the ‘Movie Genres’ link will appear under ‘Movies’ as long as it’s connected to ‘Movies’ (we’ll be connecting them in a few steps):
Setting Up The ‘Movies’ Post Type
Luckily for us WordPress does an amazing job when it comes to creating and managing custom post types. All we need to do is feed the functions.php file some info and WordPress will do all the heavy lifting.
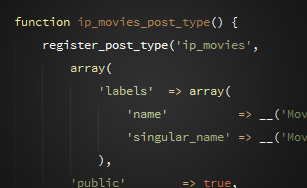
Start by creating/opening your functions.php file. We’re going to add our new post type via the register_post_type(); function. The add_action(); function is simply an initializer so WordPress knows that our function is a new post type. There are a load more options for the ‘labels’ array if you need them.
function ip_movies_post_type() {
	register_post_type('ip_movies',
		array(
			'labels' => array(
				'name'          => __('Movies'),
				'singular_name' => __('Movies')
			)
		)
	);
}

add_action('init', 'ip_movies_post_type');
At this point you won’t see anything in the back-end WordPress menu. To do that we just need to add the following below the array:
'public'        => true,
'menu_icon'     => 'dashicons-format-video',
'menu_position' => 4,
The above states that it should be a public post type, have the video icon from the Dashicons icon-font and be menu item number four (which is right below Posts).
The last few things we need to do for our ‘Movies’ post type is make it archival (which gives it its own archive type, this helps with rewrite rules). We need it to be available at a more suitable URL than ‘/ip_movies’ and we also need to tell WordPress what types of information the post supports. In this case it’s a title, the editor and a thumbnail (we’re not actually using thumbnails in this tutorial but it’s useful to know how to enable them for custom post types).
'has_archive' => true,
'rewrite'     => array('slug' => 'movies'),
'supports'    => array('title', 'editor', 'thumbnail')
That’s it for the post type! They’re really not that difficult once you understand the basic idea. Here’s what all that code should look like:
function ip_movies_post_type() {
	register_post_type('ip_movies',
	array(
		'labels' => array(
			'name'          => __('Movies'),
			'singular_name' => __('Movies')
		),
		'public'        => true,
		'menu_icon'     => 'dashicons-format-video',
		'menu_position' => 4,
		'has_archive'   => true,
		'rewrite'       => array('slug' => 'movies'),
		'supports'      => array('title', 'editor', 'thumbnail')
		)
	);
}

add_action('init', 'ip_movies_post_type');
Setting Up The ‘Movie Genre’ Taxonomy
Now we’re on to the custom taxonomy of ‘Movie Genre’. Like the post type it’s very easy to set up. In fact it’s even easier.
We start off with initializing the taxonomy. It’s basically the same as the register_post_type(); function, however here we’re using register_taxonomy();.
The first two parts of the register_taxonomy(); function state the name of the taxonomy and which post type it applies to. In this case it’s ‘ip_movies’:
function ip_movies_taxonomy() {
	register_taxonomy(
		'movie_genre',
		'ip_movies'
	);
}

add_action('init', 'ip_movies_taxonomy');
After that we simply give it labels like we did to the ‘Movies’ post type:
array(
	'labels'        => array(
	'name'          => __('Movie Genres'),
	'singular_name' => __('Movie Genre')
)
Next we rewrite the URL to something better than ‘movie_genre’. Here we’ll simply use ‘genres’ instead. Then we make the taxonomy ‘hierarchical’ so it acts more like the default Categories section, rather than the Tags:
'rewrite'      => array('slug' => 'genres'),
'hierarchical' => true
Creating the taxonomies are a bit easier than creating post types, only because there is a little less code to remember. Altogether the code should look like this:
function ip_movies_taxonomy() {
	register_taxonomy(
		'movie_genre',
		'ip_movies',
		array(
			'labels'        => array(
			'name'          => __('Movie Genres'),
			'singular_name' => __('Movie Genre')
		),
		'rewrite'      => array('slug' => 'genres'),
		'hierarchical' => true
		)
	);
}

add_action('init', 'ip_movies_taxonomy');
Using WordPress’ Built-In Menus
Don’t worry, this is the easiest part of all. Here we’re going to create a menu that can be controlled from the WordPress back-end interface.
Our friend add_action(); comes into play again. If you plan to develop a lot of WordPress sites then expect to use add_action(); a whole bunch.
function register_navs() {
register_nav_menus(
array(
'main-nav' => __('Site Navigation')
)
);
}
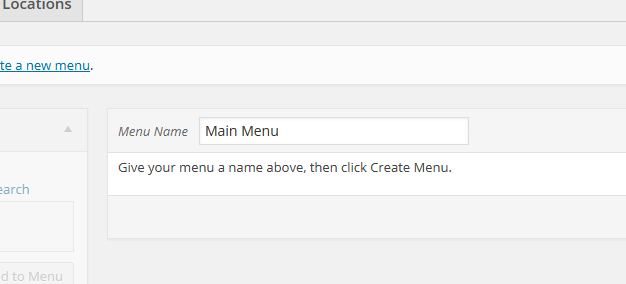
add_action('init', 'register_navs');Now we simply go into the back-end interface and setup our menu. You can do this by going to Appearance -> Menus. Give your menu a name and click Create Menu.
Add the post type to your menu as a custom link. In this case I’ve added /wordpress/movies because I’m working locally and my site is under localhost/wordpress/. On a live site you would normally just put /movies, but that depends on your own URL structure.
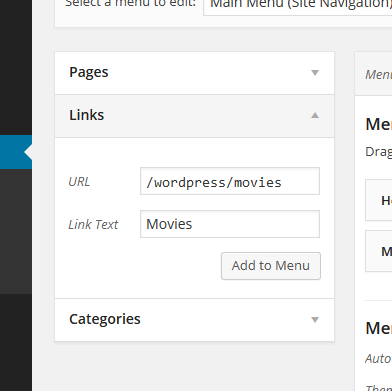
Make sure to tick the box that says Site Navigation in the Theme Locations section:

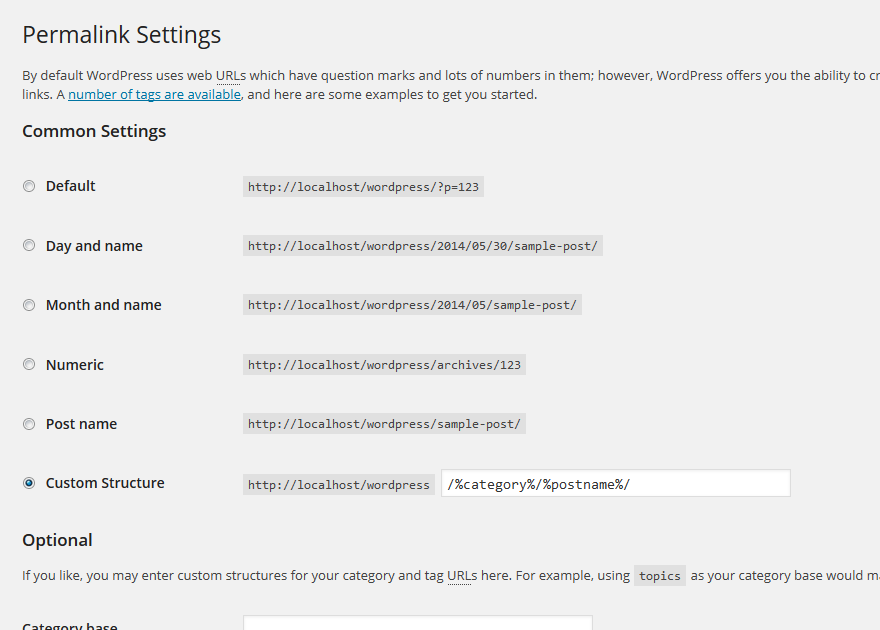
Go to the permalinks settings page, which is under Settings -> Permalinks. I usually change my permalinks to something like /category/post-name for an easy to read structure (it’s also not bad for SEO purposes). To do that you simply put /%category%/%postname%/ where is says Custom Structure.
Important: It’s also necessary to go to this page to flush the permalink settings when you setup a new custom post type. Otherwise the permalinks won’t work as expected.
Finishing Up
There is a last piece to this puzzle if you want to display your post types with some custom styling. You simply need to create an archive page for your post type. In this case the file would be called archive-ip_movies.php. ‘ip_movies’ being the name of our post type.
WordPress is also great at detecting when the current page is the post type you created and will automatically give the nav list item a class of .current-menu-item.
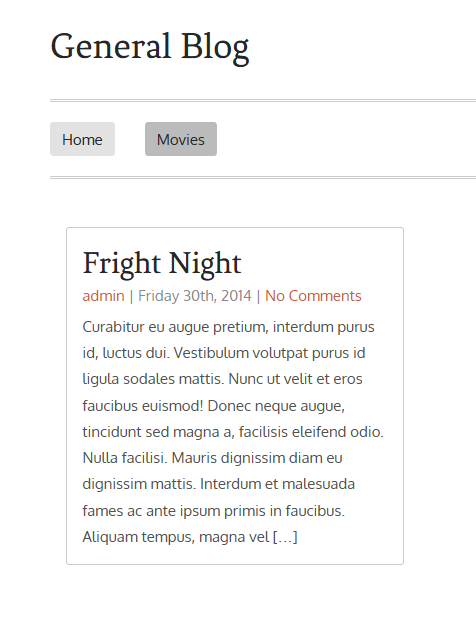
Here’s how it could look with our new custom post types and taxonomies (the example is a simple theme I created for tutorial demonstrations):
If you have any question about custom post types and taxonomies please don’t hesitate to ask me in the comments below.
goin
September 21, 2015 at 1:13 pm
Thank’s For Tutorials But Im Enconter Error( Parse error: syntax error, unexpected ‘=>’ (T_DOUBLE_ARROW) in wp-contentthemesafunctions.php on line 169)
that line of
‘menu_position’ => 4,
‘has_archive’ => true,
….
Its Good to check again i need it for some post type – thank