How to Create a Custom Login Page for WordPress
- 4 min read

WordPress is a super-powerful CMS and considering it started out as a blogging platform, it’s come a very long way. You may have seen plugins like Restrict Content Pro by Pippin Williamson or Exchange by iThemes. They’re both plugins that give you the ability to use your install as a member management or e-commerce solution.
One thing that most people want to do, myself included, is have a custom login page for WordPress. Take a look at the sign in page for The Lodge on CSS-Tricks as a good example. It’s actually quite simple and you only need some basic knowledge of WordPress templating to get started.
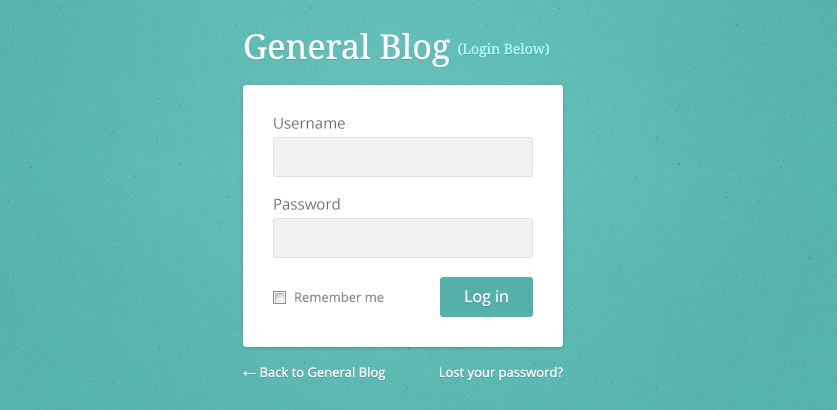
Final Result: Custom Login Page for WordPress
The Correct Files
It may be tempting at first to open up the default wordpress folder and start editing wp-login.php. This is the wrong way of creating a custom login page for WordPress. You never want to do that, let me explain why.
Reason 1: WordPress is a huge CMS so when you start messing around with its core parts things can go very wrong very fast. Without inside knowledge of what you’re messing with there’s no way to know for sure what will happen when you change some code.
Reason 2: Whenever a new version of WordPress is released any or all core files could be updated. If you’ve changed something in your development site and then WordPress gets an update you’re likely to have, at the very least, a half-broken site which is a massive security concern. You don’t want errors thrown at you (and your users!) faster than you know how to react.
In short: Don’t touch WordPress core files! Also, when I say core I mean anything that comes with WordPress it then relies on for some kind of feature or function.
1.) Custom Logo
The great part about the login page is you don’t even have to edit any HTML. You can do it all from within your themes functions.php file. Start by opening up functions.php and add the following function (take note of the function name, ip_login_styles, that’s also used on the add_action function):
<?php
	function ip_login_styles() {
	?>
		<style type="text/css">
		/* STYLING */
		</style>
	<?php
	}

	add_action('login_enqueue_scripts', 'ip_login_styles');
?>
Next we need to find out what selectors to style. This is made easy by using Firebug or web inspector (for Firefox or Chrome).
Make a note of where the images are stored. I always put all images, css and js in an assets folder so everything is organised. Within the images folder I’ve made a new folder called wp-login. This makes it much easier down the line if you need to change anything about the login page.
All it takes to change the logo is a little bit of overriding the default styles with our new styles, like so:
.login h1 a {
	width:305px;
	height:36px;
	margin-bottom:0px;
	display:inline-block;
	background:url('<?php echo get_stylesheet_directory_uri(); ?>/assets/img/wp-login/wp-login-logo.png') no-repeat;
}
2.) Background Image and Gradients
Now we’ve got our logo in place it’s time to add a background to give the design a completely new aesthetic. You’ll find the background image in the source files (download link at the top of this post).
Let me explain how the background-image attribute works here. First we set our gradient. Putting it before the image makes sure it’s loaded on top of it. The gradient values are position, first color and last color. You may notice the position values are the same as you would use for relative, absolute or fixed positioning.
If your running into any problems with your custom login page, let me know in the comments.
body {
	background-image:
	-webkit-radial-gradient(50% 160px, #5cb8b0, transparent),
	url('<?php echo get_stylesheet_directory_uri(); ?>/assets/img/wp-login/wp-login-bg.png');
	background-image:
	-moz-radial-gradient(50% 160px, #5cb8b0, transparent),
	url('<?php echo get_stylesheet_directory_uri(); ?>/assets/img/wp-login/wp-login-bg.png');
	background-image:
	-ms-radial-gradient(50% 160px, #5cb8b0, transparent),
	url('<?php echo get_stylesheet_directory_uri(); ?>/assets/img/wp-login/wp-login-bg.png');
	background-image:
	radial-gradient(circle, 50% 160px, #5cb8b0, transparent),
	url('<?php echo get_stylesheet_directory_uri(); ?>/assets/img/wp-login/wp-login-bg.png');
}
3.) Form and Inputs
If you struggled with those bits don’t worry, the rest is all straight forward. For the form and inputs you need to reference it with .login, like so:
.login form {
	border-radius:3px;
}

.login label {
	font-size:16px;
	color:#6a6a6a;
}

.login form .input {
	height:40px;
	padding:0px 10px;
	box-shadow:none;
	border-radius:3px;
	border-color:#e2e2e2;
	background:#f2f2f2;
	font-size:14px;
}

.login form .input:hover,
.login form .input:focus {
	border-color:#54b1a9;
}
4.) Button and Remember Me
The button is actually a little trickier. You need to reference it with three selectors, .login .button-primary, .login .button-group.button-large .button and .login .button.button-large.
We’ll be keeping the checkbox the same so all it needs is some margin-top.
.login .button-primary,
.login .button-group.button-large .button, .login .button.button-large {
	height:40px;
	padding:0px 20px;
	display:inline-block;
	box-shadow:none;
	border:none;
	background:#54b1a9;
	font-size:16px;
	color:#fff;
	text-shadow:0px 1px 0px rgba(0,0,0,0.2);
}

.login .button-primary:hover {
	background:#70cbc3;
}

.login .forgetmenot {
	margin-top:10px;
}
5.) Bottom Links
For some reason WordPress styles those two bottom links in a very unaligned manner. Let’s fix that:
.login #nav,
.login #backtoblog {
	margin:20px 0px 0px;
	padding:0px;
}

.login #nav a,
.login #backtoblog a {
	text-shadow:0px 1px 0px rgba(0,0,0,0.2);
	color:#fff;
}

.login #nav a:hover,
.login #backtoblog a:hover {
	text-decoration:underline;
	color:#fff;
}

.login #nav {
	float:right;
}

.login #backtoblog {
	float:left;
}
Final Result: Custom Login Page for WordPress
Conclusion and Further Reading
As you can see changing the styling to something a little more customised is actually a pretty simple task. It’s also possible to create your own login page template, which would allow editing of HTML. It’s a little out of the scope of this tutorial but I will be touching on it in future posts. There you have it, a custom login page for WordPress.
Below is some further reading material regarding the custom login page:
- WordPress Codex: Customizing the Login Form
- WordPress Codex: Custom login form